Creating a Simple Yet Complicated Dark Mode Animation
A dark mode toggle animation should have some personality. Here's my take on a unique dark mode transition animation.
Dec 20, 2020 - 30 min read
Most dark mode animations on the web look the same. This is why I wanted to create my own. Don't get me wrong, there is nothing wrong with a simple color transition. It just doesn't feel unique when almost everyone on the web use the same thing. So, here is my take on it. I'll first explain everything in a YouTube video, and then try to provide more details in text.
In very basic terms, this animation is just a HTML canvas that draws a shrinking circle. The circle shrinks or grows in size depending on if we want dark mode enabled or not. Plus, it integrates nicely with React's component states.
1) What kind of animation do I want?
a. When I click on the moon icon, the website should start drawing a circle that continuously shrinks until radius is zero. The center of the circle should be the moon icon.
b. When I click on the sun icon, the website should start drawing a circle that continuously grows until the circle covers the entire background of the page. The center of the circle should be the sun icon.
c. If the animation is still playing when I click the icon, the animation should continue playing in reverse.
d. The animation should stop when radius reaches zero, or when radius is bigger than the page width (animation is not visible anymore).
2) What are my options?
First option that comes to mind is to use a HTML canvas. Canvas allows drawing an arbitrary shape on a webpage at any given time. I need to integrate this with React and the dark mode state on my blog. The performance needs to be good enough to create the illusion of a circle growing. I do not want skipped frames.
Second option could be to use a div with 100% corner radius and resize it using javascript. However, this might be quite hacky and might introduce compatibility problems on older browsers, or maybe some newer browsers. Safari updates have caused several CSS bugs on my website before.
My recommendation is to go with a canvas.
3) How do I work with a canvas in React?
The useRef() hook can be used to get the reference for the element you're working with on the DOM. This way, we can refer back to our canvas and start drawing on it.
Here is a sample Canvas component that you can plug in and try now. It just draws a circle when mounted.
import { useEffect, useRef } from "react";

const CircleCanvas = () => {
  const canvasRef = useRef(null);

  useEffect(() => {
    const context = canvasRef.current.getContext("2d");

    context.clearRect(0, 0, context.canvas.width, context.canvas.height);
    context.fillStyle = "#00F";
    context.beginPath();
    context.arc(75, 75, 60, 0, 2 * Math.PI);
    context.fill();

    window.requestAnimationFrame(() => {});
  }, []);

  return <canvas ref={canvasRef} />;
};

export default CircleCanvas;
4) Drawing a circle that continuously grows
Up next is animating a circle that continuously grows. The canvas provides us with a function called requestAnimationFrame(callback). This function draws whatever you have in the context, and then calls the callback function when the drawing is done.
So the logic we're going to follow here is pretty simple. We're going to increase the circle radius by 0.05 each time render() is called by the requestAnimationFrame callback.
import {useEffect, useRef} from "react";

const GrowingCircleCanvas = () => {
  const canvasRef = useRef(null);

  const draw = (ctx, radius) => {
    ctx.clearRect(0, 0, ctx.canvas.width, ctx.canvas.height);
    ctx.fillStyle = \"#00F";
    ctx.beginPath();
    ctx.arc(50, 100, radius, 0, 2 * Math.PI);
    ctx.fill();
  };

  useEffect(() => {
    const context = canvasRef.current.getContext("2d");
    let radius = 0;
    let animationFrameId;

    const render = () => {
      radius += 0.05;
      draw(context, radius);
      animationFrameId = window.requestAnimationFrame(render);
    };
    render();

    return () => {
      window.cancelAnimationFrame(animationFrameId);
    };
  }, [draw]);

  return <canvas ref={canvasRef} />;
};

export default GrowingCircleCanvas;
This allows us to get a circle growing at a constant speed. There is no way to make the circle smaller yet, but that's ok. We're going to address that issue at a later stage.
5) Adjusting the scaling and resolution for the canvas
Depending on how you placed your canvas in your page, you might have noticed that the canvas looks pixelated. This happens because we manually need to adjust the scaling factor of the canvas. All devices come with different screen pixel ratios. Here is the code that adjusts canvas draw resolution. Place it in your useEffect() function.
const { width, height } = context.canvas.getBoundingClientRect();
if (context.canvas.width !== width || context.canvas.height !== height) {
  const { devicePixelRatio: originalRatio = 1 } = window;
  // we don't need such a high resolution for this type of animation. Plus it makes the edges
  // of the circle look blurred, which looks nicer. Also improves performance a lot on slow GPUs
  // change from 0.5 to 1 if you want to use display's native resolution.
  const lowerResolutionRatio = originalRatio * 0.5;
  context.canvas.width = width * lowerResolutionRatio;
  context.canvas.height = height * lowerResolutionRatio;
  context.scale(lowerResolutionRatio, lowerResolutionRatio);
}
6) Time-based rendering for consistency
When you're programming animations, it's a good practise for your animation speed to be based off of real time. Let me explain by a simple example:
On the left, there is a laptop from 2006 with a highly underclocked CPU. On the right, I have my 2019 laptop. If it takes more time to draw a frame on a slow CPU, the animation should not slow down right? We want the animation to take the same amount of time on the same screen size. If the CPU is too slow, then we should let the animation skip a few frames. This is what games do as well. If your computer is slow, frames per second will be lower but physics and animations will be playing out exactly the same as a super fast computer.
Time delta between current and previous frames can be used to calculate what the radius should be. If there is a 10 ms difference between frames, the radius should be growing at a rate of 10 pixels per draw. If there is a 100ms difference between frames, the radius should be growing at a rate of 100 pixels per draw and so on.
This logic can be implemented with the code fragment below. When we're calculating the radius for the next frame, we're going to subtract the time at previous completion from now. This value is going to be multiplied with RADIUS_INCREASE_PER_MS to get the actual radius.
import {useEffect, useRef} from "react";

const GrowingCircleCanvasTime = () => {
  const canvasRef = useRef(null);
  const RADIUS_INCREASE_PER_MS = 0.05;
  let timeAtPreviousDraw = Date.now();

  const draw = (ctx, radius) => {
    ctx.clearRect(0, 0, ctx.canvas.width, ctx.canvas.height);
    ctx.fillStyle = "#FFF";
    ctx.beginPath();
    ctx.arc(50, 100, radius, 0, 2 * Math.PI);
    ctx.fill();
  };

  useEffect(() => {
    const context = canvasRef.current.getContext("2d");
    let radius = 0;
    let animationFrameId;

    const render = () => {
      const timeAtRenderStart = Date.now();
      const timePastSincePreviousDraw = timeAtRenderStart - timeAtPreviousDraw;
      // In the future, we will get computers so fast that the difference between
      // previous and current frame is less than 1ms. Math.max() ensures that we
      // still grow the circle even if the computer is super fast.
      const timePastSinceLastDraw = Math.max(1, timePastSincePreviousDraw);
      radius += RADIUS\_INCREASE\_PER\_MS * timePastSinceLastDraw;
      timeAtPreviousDraw = timeAtRenderStart;
      draw(context, radius);
      animationFrameId = window.requestAnimationFrame(render);
    };
    render();

    return () => {
      window.cancelAnimationFrame(animationFrameId);
    };
  }, [draw]);

  return <canvas ref={canvasRef} />;
};

export default GrowingCircleCanvasTime;
7) Making the animation look nicer
Animations don't look as nice when they play at a constant speed. Imagine you're scrolling on your smartphone. The animation starts fast as you flick your finger and then slows down gradually right? Or when you quit an app, there is always some sort of speed-up or slow-down as the animation plays. This behaviour creates the illusion that the animation is more fluid and responsive. Those animations rely on exponential mathematical functions to achieve the aforementioned behaviour. For the growing circle animation, I've tried several different functions and liked this one the best:

This will ensure that the circle starts growing slowly at first and then exponentially gets faster. This behaviour makes the whole animation feel more alive. See comparisons below (exponential on the left, linear on the right):
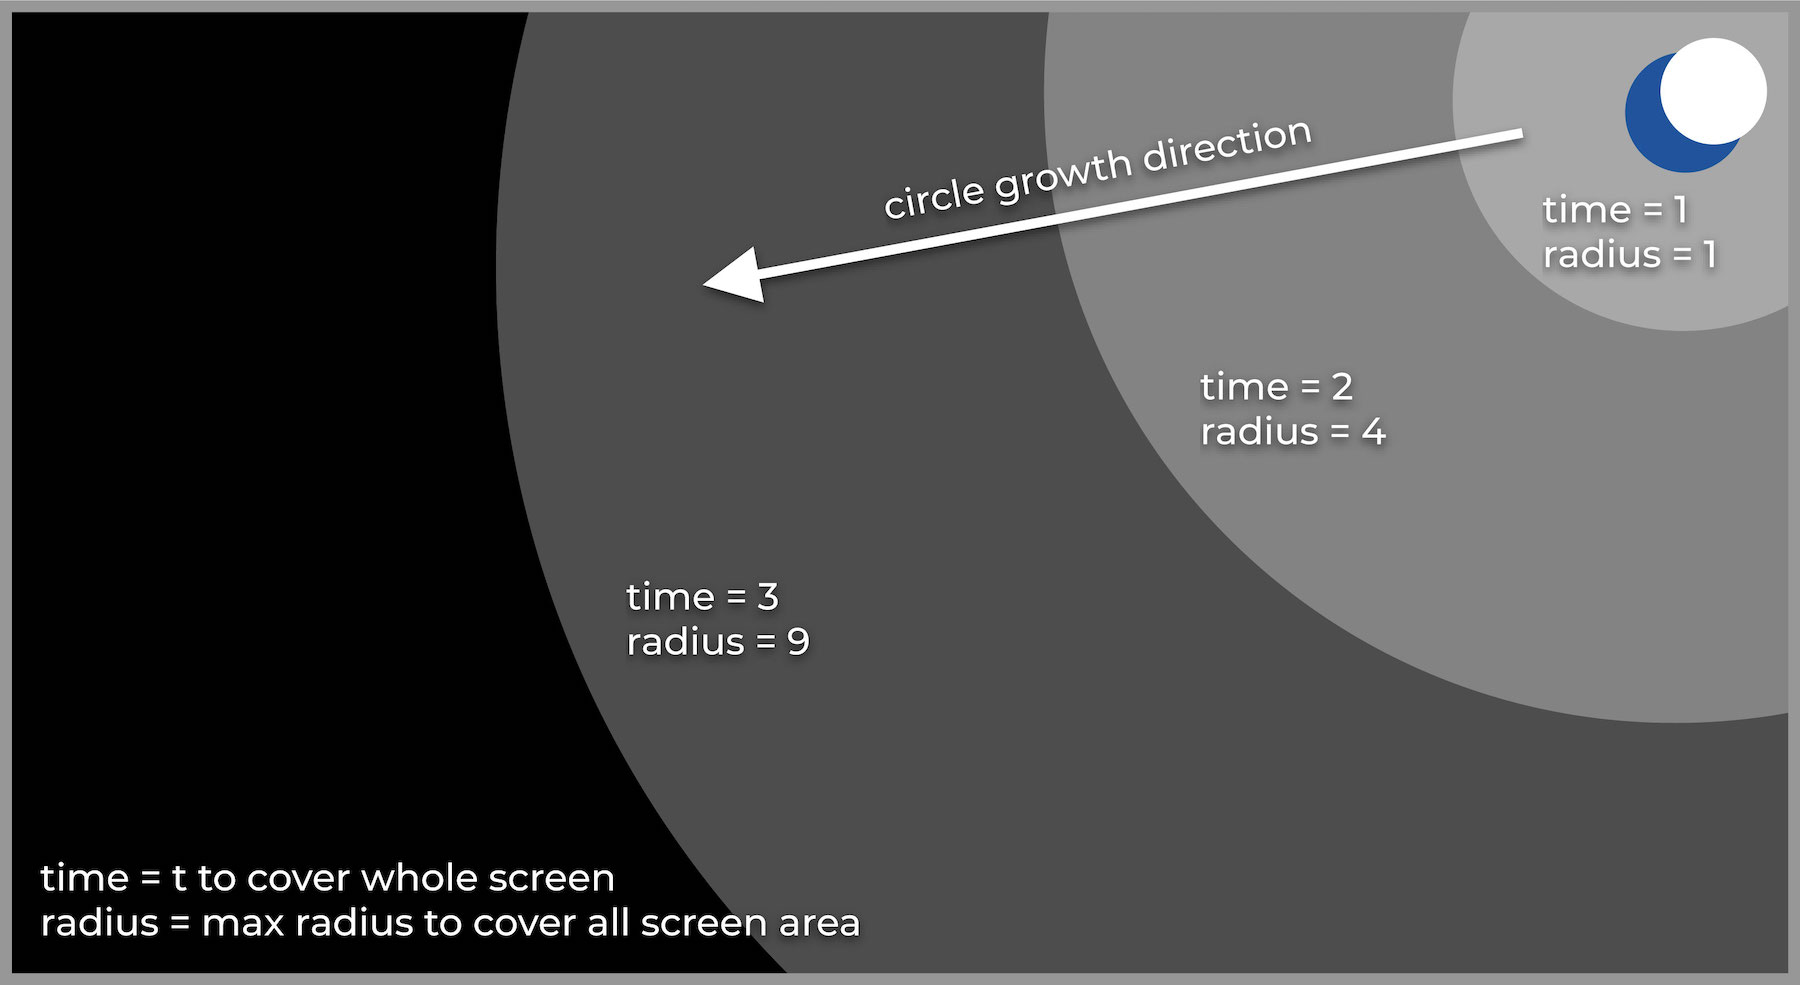
8) When to stop the animation
So knowing when to stop when shrinking the circle is simple. When the radius reaches zero, we can stop drawing the circle and stop animating. What if the circle is growing though? The radius is going to be different for all screen sizes. The radius of the circle on a smartphone vs a 27" monitor will be very different. Plus, we are working backwards from an exponentially increasing radius. Here is what we need to figure out when to stop:
1. Browser window width and height - We don't need to keep drawing circles if the radius is way past the screen size. There is no point in animating if the user can't see the animation.
2. Maximum radius for given window width and height - We're going to use this to figure out the maximum value that the exponential growth function can take.
For the first item, window.innerHeight and window.innerWidth can be used.
For the second item, we can reverse the exponential function and get the maximum value our actual radius can take before
the exponential operation.
const screenHeight = window.screen.height;
const screenWidth = window.screen.height;
const maxRadiusMultiplier = Math.pow(Math.max(screenWidth, screenHeight), (1.0 / GROWTH\_FUNCTION\_EXPONENTIAL));
When animating, the current radiusMultiplier can be compared with the maxRadiusMultiplier. If we're past maxRadiusMultiplier, then it's time to stop animating.
9) Using canvas as page background
This canvas is going to cover the whole background of the page. This means the width and height
must be set accordingly for this canvas. CSS properties can be used to adjust this. Apart from that, canvas needs to stay at the
back of all other items on the page. CSS z-index property will be useful. Finally, when there is nothing on the canvas,
it behaves as a transparent layer. The background property should be the
colour that you want to display in your dark mode.
.size
  width: 100vw
  height: 100vh
  position: fixed
  z-index: -1
  background: #111
10) Start Drawing On Dark Mode Toggle Click
The canvas we have currently draws growing circle on render but how do we start drawing on a mouse click event?
This is where I'm going to define my CustomEvent. A custom event is very similar to a MouseEvent or ResizeEvent or any other event you've probably come across when working with browser event listeners in JavaScript. A CustomEvent allows you to fire events at any given point in your code. This event can be caught by an event listener attached to another component in your codebase. For my use-case, I'm going to create a custom event in DarkModeToggle component. This component houses the button that the user clicks to toggle dark mode. When the button is clicked, DarkModeToggle component is going to fire an event. This event will be caught by my canvas component.
Additionally, CustomEvents can take parameters and pass them together in the event object. When a user clicks the dark mode toggle, the button's coordinates will be sent together with the event. Canvas component will use these coordinates as the center of the circle.
const circleCenterCoordinates = {
  x: null,
  y: null,
};

const GrowingCircleAnimation = ({ isDark }) => {
  useEffect(() => {

    .
    .

    const handleClick = (event) => {
      // fill in the mouse coordinates when we receive a click so we know the center of the circle
      circleCenterCoordinates.x = event.detail.x;
      circleCenterCoordinates.y = event.detail.y;
    };

    window.addEventListener("darkModeToggle", handleClick);
    return () => {
      isStateMachinePowered = false;
      window.removeEventListener("darkModeToggle", handleClick);
    };
  }, []);

  return <canvas ref={canvasRef} />;
};
This is only the listener part of the code. Up next, DarkModeToggle needs an update.
11) Get Mouse Coordinates of the Dark Mode Toggle
The CustomEvent created in the previous step can be used to pass some data. In this case, the mouse coordinates of the dark mode toggle button are passed in the event. This event then gets picked up by the canvas component. Canvas component extracts the coordinates and sets them as the center coordinates of the circle.
const onClickWrapper = (onClickMethod, isDark, event) => {
  const bodyRect = document.body.getBoundingClientRect();
  const elemRect = event.target.getBoundingClientRect();
  const offsetLeft = elemRect.left - bodyRect.left;

  const customEventState = { // custom object to wrap event data
    x: offsetLeft + elemRect.width / 2, // center coordinates of the dark mode toggle on the x-axis
    y: elemRect.top + elemRect.height / 2, // center coordinates of the dark mode toggle on the y-axis
  };

  const darkModeToggleEvent = new CustomEvent("darkModeToggle", { detail: customEventState });
  onClickMethod(isDark);
  storage.setItem("theme", isDark.toString());
  dispatchEvent(darkModeToggleEvent);
};

const DarkModeToggle = ({ isDark, onClickMethod }) => {
  return (
    <button
      type="button"
      aria-label="Dark Mode Toggle"
      onClick={(event) => onClickWrapper(onClickMethod, !isDark, event)}
      className={`${isDark ? moon : sun} ${darkModeToggle}`}
    >
      <div className={crescent} />
    </button>
  );
};
12) Designing a state machine
Animation code requires consistent structure. I can use what we have at hand so far. Yes, it just draws a growing circle, but that's ok. I can reverse the animation by subtracting the radius instead of adding it on each render. In fact, I've done that. I've quickly realised it was turning into this mess that I would never be able to explain on a YouTube video, nor a blog post. I had to come up with a good solution.
A finite state machine can be used to drive
this animation. If you think about it, we have two main states. IsDark, or !IsDark. Following that, we always have
a shrinking or a growing circle. This is the machine diagram I managed to come up with:

When we land on the page with the canvas, we need to initialise the canvas driver state machine. Right after the
initialisation, we kick off the machine. The state machine either keep shrinking or growing the circle depending on
if the state is IsDark or !IsDark. When the circle radius reaches zero or maximum, state machine ends operation.
This approach was way cleaner compared to what I had before.
13) Implementing the state machine
At the top, I have a list of global state variables. These variables are accessible from every state of my machine. Then, I have a list of states. Each state evaluates some variables, manipulates the canvas if necessary and then returns the next state. If there is no next state, it returns null. Here is a very pseudo-code version.
// circle animation state machine
const m = {
  ctx: null, // canvas context
  isDark: null,
  radiusMultiplier: null, // current radius
  maxRadiusMultiplier: null, // maximum possible radius for the given screen size
  timeAtPreviousDraw: null,

  createMachine: (ctx, isDark) => {
    // do some setup
    return m.start;
  },
  start: () => {
    return m.isDark ? m.shrinkCircle : m.growCircle;
  },
  growCircle: () => {
    // make radius bigger
    return m.verifyCircleBounds;
  },
  shrinkCircle: () => {
    // make radius smaller
    return m.verifyCircleBounds;
  },
  verifyCircleBounds: () => {
    // if circle is outside of the bounds, paint the canvas to the final colour and end
    return null;
    // else just clear the canvas before drawing the next frame
    return m.drawCircle;
  },
  drawCircle: () => {
    // note down the time when we started drawing
    // draw the circle and go back to the start state
    return m.start;
  },
};
Then I can assign the start function to a variable. Then I can call the function in the variable and keep assigning it back to itself. When it returns null, I won't do another call. This is best illustrated with a code snippet:
let stateMachine = m.createMachine(ctx, isDark); // create a state machine and assign it to a variable
const stateMachineRunner = () => {
  if (stateMachine !== null) {
    stateMachine = stateMachine(); // start by calling the function createMachine() returns
    stateMachineRunner(); // keep calling stateMachineRunner() until state machine returns null as the next state
  }
};
stateMachineRunner();
14) Create Machine - setup function
We've created a state machine but a setup function is required to set the initial state for all variables. This step will be run only once as an entry point and will be responsible for setting up the canvas resolution and calculating the max radius multiplier. Additionally, this step will decide if the animation should play or not depending if the user actually clicked the dark mode toggle or not.
If you've made this far into the blog post, that means you're ready to start reading actual code. I'm going to point you to the full canvas component. Read the createMachine() state code yourself. It has the necessary comments.
15) Fixing weird bugs and glitches
It's time for QA. The first bug we encounter is related with page resizes. A page resize happens when you take a browser window on your laptop and just resize it. The best and easiest thing to do in this case is to reset the state machine altogether. This is a compromise I'm willing to make because the animation takes less than 1 second to complete. A user can't ideally resize the window in less than a second after clicking the dark mode toggle.
Second bug happens when we pinch to zoom in on a mobile phone and click the dark mode toggle button. When a user does pinch to zoom, scaling factors, window width and other things break. There is yet another StackOverflow post explaining how to fix this issue.
// when mobile device is zoomed in using the pinch gesture,
// we need to get the relative coordinate on the page.
const bodyRect = document.body.getBoundingClientRect();
const elemRect = event.target.getBoundingClientRect();
const offsetTop = elemRect.top - bodyRect.top;
const offsetLeft = elemRect.left - bodyRect.left;

// this tells us how much the user has zoomed in using the pinch gesture
const deviceZoomRatio = document.documentElement.clientWidth / window.innerWidth;

const customEventState = {
  x: offsetLeft + elemRect.width / 2,
  // if the user is pinch zoomed in, then use the pinch zoom coordinate detection logic,
  // otherwise, use the distance of the icon from the top of the page. For some reason
  // offsetTop doesn't work when the user scrolls down and the zoom ratio == 1 (iOS14)
  y: (deviceZoomRatio > 1 ? offsetTop : elemRect.top) + elemRect.height / 2,
};
Third bug happens when we change the scaling factor in iOS safari. When a user switches from dark mode to light mode in a smaller scale and sets a bigger scaling factor, animation won't work anymore. This is due to the radiusMultiplier from the previous state being bigger than the new maxRadiusMultiplier.
This is it. After this point, I see no benefit of putting code snippets here anymore. From now on, you're better off reading the actual source code than this blog post if you're looking for answers. Shoot me an email if you have questions.
It doesn't mean it's impossible to do if there are no other examples of it on the web.
Now go and add some personality to your website. Also star the github repo for this website.